Friday, October 12, 2018

Iron Marines - Heroes (Tips)

Iron Marines
Basic Information:
Game Genre: Strategy (A blend of RTS and Tower Defense)

PC: I'm not sure

App: "Purchase Require" App before you can download (100+ MB) and can play offline; will require be online and re-paid card (real money) of some kind if you wish to purchase stuff within the game. -------------------------------------------------------------------------------------------------------------
From the creator of "Kingdom Rush" tower defense series. This game play out as a blend of RTS and bases defense. Here are a list of "Hero" that will help you on your mission campaign. This is based on my personal opinion and playstyle.

Personal Opinion Rating (with explanation):
  • Bad:
  • Fair:
  • Good:
Those with no rating are usually the Free hero you get, unless they "bad" I have no comment on them. All personal rating is based of hero's skills and how I uses them.

Hero Upgraded and Level Up:
  • Max level is 10
  • There are 3 section of upgrade; first two are active skill while the last one is passive skill
-------------------------------------------------------------------------------------------------------------

Available "Hero" (Free)

-------------------------------------------------------------------------------------------------------------
Taggins

Primary Attack: Range
My Personal Comment: Hero version of the marine unit
-------------------------------------------------------------------------------------------------------------
Kara

Primary Attack: Range
My Personal Comment: longer range
-------------------------------------------------------------------------------------------------------------
Paragon

Primary Attack: Melee
My Personal Comment: No Comment
-------------------------------------------------------------------------------------------------------------

Purchase Required "Hero" (With Real Money)

-------------------------------------------------------------------------------------------------------------
Fate

Primary Attack: Range
My Personal Opinion Rating: Fair

Comment/Reason: No Comment
-------------------------------------------------------------------------------------------------------------
Ajax

Primary Attack: Melee
My Personal Opinion Rating: Fair

Comment/Reason: No Comment -------------------------------------------------------------------------------------------------------------
Darwin

Primary Attack: Melee
My Personal Opinion Rating: Fair

Comment/Reason: No Comment -------------------------------------------------------------------------------------------------------------
Guiying

Primary Attack: Melee
My Personal Opinion Rating: Fair

Comment/Reason: No Comment ------------------------------------------------------------------------------------------------------------- 
Roy

Primary Attack: ?
My Personal Opinion Rating: (?)

Comment/Reason: Have not uses it yet (N/A)
-------------------------------------------------------------------------------------------------------------
Shatra

Primary Attack: Melee
My Personal Opinion Rating: Fair

Comment/Reason: This hero is back but is not better. Even compare to the previous games, those were much better then this.
-------------------------------------------------------------------------------------------------------------
Dr. Graaff

Primary Attack: Range
My Personal Opinion Rating: Fair

Comment/Reason: No Comment
-------------------------------------------------------------------------------------------------------------
Trabuco

Primary Attack: Range
My Personal Opinion Rating: Fair

Comment/Reason: The Free "Hero" Taggins is much better then this.
-------------------------------------------------------------------------------------------------------------
Sparas

Primary Attack: ?
My Personal Opinion Rating: (?)

Comment/Reason: Have not uses it yet (N/A)
-------------------------------------------------------------------------------------------------------------
Mark X

Primary Attack: Range
My Personal Opinion Rating: Good

Comment/Reason: The only hero (so far) and any other control units that can shoot while moving.
-------------------------------------------------------------------------------------------------------------
Blue Dragon

Primary Attack: ?
My Personal Opinion Rating: (?)

Comment/Reason: Have not uses it yet (N/A)
-------------------------------------------------------------------------------------------------------------

Thursday, July 12, 2018

Crash Fever - Special Event [Ultimate Quests] And/Or Higher (My Personal comment and team setup at the time, The one I beat)

These are some of the [Ultimate Quests] and/or Higher that I beaten whether I barely beat it or got it easy done because I got the right units in hand. Beyond Ultimate are [Spectre Quests] and [Omega Quest]. All these quest are under "Special" and don't come that often.

------------------------------------------------
Victory come in 3 category for me:
  • Easy Victory: easy win/stream roll
  • Normal Victory: there some struggle but I got through it with my gamer ability.
  • Barely Won Victory: struggle alot but I still won somewhat. It not the best I can do but it the best I can do at the time with my current unit.
------------------------------------------------------------------------------------------------------------------------
------------------------------------------------------------------------------------------------------------------------
Bewitching Erosion [Ultimate Quests]

Floor: 4
  • Floor 1: skill bind/protect/sleep/virus/ sometime junk
  • Floor 2: junk and protect
  • Floor 3: skill bind and ability lock. You got 4 turns to kill the enemy before instant death attack.
  • Floor 4: 3 round, timer/damage/junk
Comment: lot of gimmick of every kind but most of enemies here are green units. My opinion is to have everyone on your team to at least have 2 anti gimmick of a sort. What I focus on was junk and the 3rd floor then anything else but my mistake was not have one damage breaker however I got luck that I won after several tries.

Unit at the time I won (in order and not necessary a max bug unit):

Result: Barley won and I got lucky
------------------------------------------------------------------------------------------------------------------------
The Immortal King [Wizard/Ultimate]

Floor: 2
  • Floor 1: Protect/Damage
  • Floor 2: (2 Round); Protect/Damage
Comment: All the enemies in this quest are green unit and you don't have to worry about the damage panel as they don't damage much and should focus on the protect panel.

Unit at the time I won (in order and not necessary max bug unit):
Helper (at random):
My main two attacker is Chunhyang and Gilsan with their combine skills activated while Himiko is just for max bug and the helper is just there. Chunhyang should always be in front when you combine your skills with Gilsan to get the maximum attack power.

Result: Normal Victory 
------------------------------------------------------------------------------------------------------------------------
------------------------------------------------------------------------------------------------------------------------
The Immortal King [Spectre]

Floor: 2
  • Floor 1: Protect/Damage
  • Floor 2:  (2 Round); Protect/Damage
Comment: All the enemies in this quest are green unit but this time you cannot ignore the damage panel as they are dangerously damaging. You need both protect breaker and damage panel breaker.

Unit at the time I won (in order and not necessary max bug unit):
  • Incinerating Flame Jang Gilsan
  • Hawk and Flame Roy & Riza
  • Pure Love Singer Chunhyang
  • Night Desires Samhain

Result: Barley won and I got lucky
------------------------------------------------------------------------------------------------------------------------
------------------------------------------------------------------------------------------------------------------------
Supremacy is Mine! [Ultimate]

Floor: 4
  • Floor 1: High attack to samurai unit/virus all unit expect fantasy unit/ lower att/junk
  • Floor 2: (2 Round); junk
  • Floor 3: (2 Round); junk, will skill bind at start (beware of its warning of it high attack and when it coming). In R2, will absorb non green to attack beside junk.
  • Floor 4: (3 Round); junk/absorb junk to attack/timer/lower attack/reduce tap time/skill bind/lower CP spawn. In R3, will have high damage if it HP is over certain amount as warn to you.
Comment: All the enemies in this quest are yellow unit that drop or create junk. Don't bring Samurai unit. Recovery, Fantasy, and Balance units will get some benefit. There will be lower rec/att/bomb blast. There will be skill bind and other gimmick.

Unit at the time I won (in order and not necessary max bug unit):
Team 1

Result: Normal Victory; play it smart and uses skill when it available or when one full benefit of a skill ended uses another. In team 1; I create a whole team of green fantasy junk breaker.
-----------------------------------------------------------------
Team 2:
Team 2
Result: Normal Victory but borderline Easy Victory.
-----------------------------------------------------------------
Team 3:
Result: Normal Victory but the battle was drag on for a bit.

------------------------------------------------------------------------------------------------------------------------
------------------------------------------------------------------------------------------------------------------------
Mental Black Fire Dragon [Legend/Wizard/Ultimate]

Floor: 3
  • Floor 1: Blue unit; freebie
  • Floor 2: (2 Round, blue unit); junk
  • Floor 3: (3 Round, red unit); junk/timer/darkness/skill bind/lock panel. In R1, you be skill bind for several turns and have your HP down to 1 percent each turns plus virus. You have to heal up at least 20-25% of your total hp to survive at each turns for the virus and not the 99% hp attack. You have to wait it out until you can uses your skill. In R2 you got darkness the whole round and the enemy may absorb to attack. In R3, the enemy is going to lock panel one by one of each color until every panel that not normal is lock (CP is not lock) and will warn you of instant death attack is coming.
Comment: You need junk breaker in this quest. What you needed to worry about is surviving the boss fight.

Unit at the time I won (in order and not necessary max bug unit):
Team 1
  • Perceptive Sleuth Poirot
  • New Morning Guard Kim Yooshin
  • Blue Snowflower Janghwa
  • Blue Snowflower Janghwa

Result: Normal Victory but borderline Barely Won.
-----------------------------------------------------------------
Team 2:
Team 2
  • Perceptive Sleuth Poirot
  • New Morning Guard Kim Yooshin
  • Blue Snowflower Janghwa
  • Water's Edge Banquet Freud
Result: Normal Victory but borderline Barely Won. The main attacker and the one that does the most damage to the enemy is Janghwa
------------------------------------------------------------------------------------------------------------------------
------------------------------------------------------------------------------------------------------------------------
I'm going to get a miracle! [Wizard/Ultimate]

Floor: 3
  • Floor 1: Blue unit
  • Floor 2: (2 Round, blue unit); protect/junk
  • Floor 3: (3 Round, blue then red unit); protect/absorb heart/absorb panel to attack
Comment: You need protect breaker in this quest and maybe unit that have CP with recovery. I can beat it in [wizard] no problem but in the [ultimate] if you don't kill it in one go in the R3 in floor 3 before it attack, the chance of you surviving it attack when it absorb almost all the panel to attack you are low.

Unit at the time I won (in order and not necessary max bug unit):
  • Phantastic Master Nodens
  • Deep Sea He Xiangu
  • Raging Fluid Cannon Bernoulli
  • Winter Plumage Boole

Result: Barley won
------------------------------------------------------------------------------------------------------------------------
------------------------------------------------------------------------------------------------------------------------
Starfire upon the Ice [Ultimate]

Floor: 4
  • Floor 1: Blue unit; freebie
  • Floor 2: Red unit; junk/5 junk to bomb while the rest are absorb for buff or attack or heal for itself.
  • Floor 3: Blue unit; timer/lower tap time
  • Floor 4: (2 Round, Red Unit); R1: junk/5 junk to bomb while the rest are absorb for buff or attack or heal for itself. R2: timer/ virus itself/absorb bomb for attack buff but will be lower effect the more bomb it absorb.
Comment: You need junk breaker in this quest and there also timer gimmick. You can said floor 2 and 3 is just for surviving the battle before they leave on their own. Although it not stated, there are no heart panel in quest. My advise is to don't leave more then 5 junk on the board because they be turn into bomb (benefit) for you first (1st five junk) while the rest are absorb for something not good for you (danger).

Unit at the time I won (in order and not necessary max bug unit):
  • Perceptive Sleuth Poirot
  • New Morning Guard Kim Yooshin
  • Blue Snowflower Janghwa
  • Blue Snowflower Janghwa

Result: Normal Victory but the battle will be drag on for a bit. (*I now know how come I healed when none of my unit can heal, it the max bug benefit. I'm not talking about the leader unit but the overall the total max bug unit I own)
------------------------------------------------------------------------------------------------------------------------
------------------------------------------------------------------------------------------------------------------------
Time Travel in ALICE -The First- [Wizard/Ultimate]

Floor: 4
  • Floor 1: (Red Unit); hack/timer
  • Floor 2: (Red Unit); hack/timer
  • Floor 3: (Red Unit); hack/timer
  • Floor 4: (Red Unit, 3 Round); hack/timer
Comment: You need Anti-hack in this quest and and there will be timer gimmick. All units in this quest are red units.

Unit at the time I won (in order and not necessary max bug unit):

Result: Normal Victory
-----------------------------------------------------------------
Team 2:
Result: Normal Victory

------------------------------------------------------------------------------------------------------------------------
------------------------------------------------------------------------------------------------------------------------
Bakumatsu on the Beach [Wizard/Ultimate]

Floor:
  • Floor 1: (green or yellow or blue unit); junk
  • Floor 2: (3 Round, Green unit); junk
Comment: You need junk breaker in this quest and no samurai unit.

Unit at the time I won (in order and not necessary max bug unit):

Result: Normal Victory
-----------------------------------------------------------------
Other Team:
Results: Normal Victory 
------------------------------------------------------------------------------------------------------------------------
------------------------------------------------------------------------------------------------------------------------ 

Wednesday, June 13, 2018

Crash Fever - Qilin Invades! [Ultimate Quests] (My Personal comment and team setup at the time)

Qilin Invades! Wiki Link

These are the unit I have and uses at the time when I beat this [Ultimate Quests]. I will explains/comments the good and the bad of it.

The following unit are in this order:
Helper (some of theses unit I already own but I uses other people because of the links thingy. I uses them when available and I will explain each of them.)

However if you have Sweet Witch Seduction Sucre (Drop; Event Quests - Special), it will work well with Probably Discrete Poisson (Fever Festival Hatcher) as it reduce the skills at the starts.

Pleased note I using "Spring Love Fairy Fay" as my front unit is because it the only green unit at the time that can heal hp in CP. There are better unit out there but I don't have it as max bug at the time I beat this.

Note: Recommend you have at least one unit with "junk break" and one unit that can recover your HP (which I did with "Cybernetic Fortune Happy"). But for my team build I gone with one unit with junk break plus healer (skill for healing and junk break in ability) and one semi healer (CP). All the team build will result in victory, whether it quick or slow victory. There are no barely won in this team build unless you don't know how to uses skills or your head.

------------------------------------------------
Victory come in 3 category for me:
  • Easy Victory: easy win/stream roll
  • Normal Victory: there some struggle but I got through it with my gamer ability.
  • Barely Won Victory: struggle alot but I still won somewhat. It not the best I can do but it the best I can do at the time with my current unit.
---------------------------------------------------------------------------------------------
Most of the focus is on the 1st floor with you trying to take out "Suzaku" (the red bird) as fast as possible being that if your whole team is green unit and it's a red unit which is strong against you.

If I go with the 1st team build: Fay, Euler, Happy, and Poisson, I would try to board prep and heal with heart as much as possible while focusing (target) on "Suzaku". My first unit that can uses skill would be "Fay" but it doesn't do much damage. I have to withstand two attack at the same time from both enemy (recommend having 80-100% of your HP full to survive) before "Poisson" can uses it skill to defeat "Suzaku" while healing with it CP.

Once you defeat "Suzaku", all your other unit can uses skill by now. After "Suzaku" uses skill when available on all other floor expect "Happy". I only uses "Happy" skill when my HP is down below 50%. I see the first team build as tough it out (the bird) while defeat the rest.

Pro: Once you pass the bird, the rest will be quick because Euler and Poisson can help each other skill wise.
Con: Lack of total HP when facing the 1st floor until you can uses your skill that can kill the bird.

Quick summary and result: If you can survive and kill the bird, the rest is quick and easy if you play it smart in using your units skill.
----------------------------------------------------------------------------------------------
I going be lazy and write the rest in quick summary because most are almost the same in term of tactic except the team build up.
----------------------------------------------------------------------------------------------
If I go with the 2nd team build: Fay, Euler, Happy, and Pauli. I have enough total HP to survive until I can uses any skill among my unit. And the rest is the same as above.

Pro: have enough total HP to survive until I can uses any skill to kill the bird
Con: it no speed demon fast kill like team one. it fast then slow then fast again.

Quick summary and result: The battle will be constant at a steady pace neither too fast or too slow (depending when you uses your unit skills) but you get there.
----------------------------------------------------------------------------------------------
Team 3 build with "Leif" will be similar to team 2 build in the pro and con as well as the end result.
----------------------------------------------------------------------------------------------
Team 4:

Result: Normal Victory but borderline Easy Victory. This maybe due to the fact that some of my unit reduce skill tap at the start that I have an easier time killing the bird earlier.  
----------------------------------------------------------------------------------------------

Thursday, April 26, 2018

Crash Fever - Rank Quests Tips (Work In Progress for One Self)

Game: Crash Fever
Platform: iOS and Android
Cost: Free to Download (Certain in-game items may require real world money to purchase)

Require be online to play
----------------------------------------------
Crash Fever Wiki!
Crash Fever Official Site - Japanese Language
----------------------------------------------
This is just tips and not a strategy guide. I don't know what unit/s you may have and so I can't say anymore detail then a general tips as a guideline. The above link may have some more detail pointer but this here (blog) is for myself and all the one I done and/or needed to be noted (I done). Most information is based on my game experiences.

If there a (?) it mean I don't remember. Caution this is work in progress and the information may change if the game updated. If I don't put any information about a certain floor or whatever, it either I don't have the information or it not significantly important (at least to me) that most people couldn't deal with it. Rank Quest are equivalent to a "Legend" or "Wizard" difficulty.

I will not give a personal opinion on how hard it is according to me.
------------------------------------------------------------------------------------------------------------------------
  • Overview (taken from wiki):
    • Aim for as much Damage Dealt as possible
      • In general for all Rank Quests, the Damage Dealt score is a major factor in achieving a high ranking. Use Fever and Skills as much as you can to try to aim for a high score.
    • Aim for as few Clear Turns as possible
      • In general for all Rank Quests, you want to clear them as fast as possible in order to achieve a high ranking. Clear each floor as fast as possible to aim for a high score.
------------------------------------------------------------------------------------------------------------------------
  • Neumann Challenge
    • Comment: Try not to uses Demon unit if you can and there are Protect gimmick in this quest.
      • 1F: Blue attribute (start of the round: protect yellow panel +easy CP spawn for yellow unit [player advantage]+ Attack boost for stamina type [player advantage])
        • Middle Blue: attack, prioritize demon unit first
      • 2F: Blue attribute (2 Round)
        • R1: 3 green to SCP of the front unit at the start of the round (player advantage) plus reduce 90% of all non-yellow attack for 5 turns/protect heart plus attack
        • R2: 3 green to SCP of the front unit at the start of the round (player advantage)
      • 3F: Blue attribute (2 Round)
        • R1: 3 heart to SCP (player advantage) plus protect 20 panel at the start of the round/20 panels to Heart plus protect 20 panel/4 hit combo, prioritize demon unit first
        • R2: protect 20 panel at start of the round/absorb blue to attack/20 panel to Heart
      • 4F: Blue attribute (2 Round)
        • R1: At start of the round; deactivate all effects + Protect Red & Yellow panel + reduces 90% of all attribute attack for 1 turn/2 hit combo/2 hit combo, prioritize demon unit first/1 panel to blue bomb (player advantage)
        • R2: At start of the round; protect green panel + lower CP spawn rate/2 hit combo/2 hit combo, prioritize demon unit first/2 panel to blue bomb (player advantage)
      • 5F: Blue attribute (3 Round)
        • R1: lower tap to 1 for 4 turn plus lower rec
        • R2: 2 hit combo, prioritize demon unit first/absorb panel to attack/convert 10 panel to CP of the front unit (player advantage)
        • R3: deactivate all effect + absorb all panel for buff attack at start of the round
------------------------------------------------------------------------------------------------------------------------

Tuesday, April 17, 2018

Crash Fever - Gimmicks (Explanation)

This blog may be update due to new gimmicks that arrive in my version of the game and/or a new new information that I figure out through observation, experiences, and/or look up.

The following information is taken from http://www.crashcodex.com/. I will state and restated which is in my own word and other which is the from the website.

Image/Picture may or may not be put to show an example of the gimmicks if it can be shown.

Exact word from the web site: example
Restated info from the web site: example (for easy read)
My stated info: example (I wouldn't write anything if there no new info or the information presented is not confusing by web site)
------------------------------------------------------------------------------------------------------------------------
  • What are quest gimmicks and how do I deal with them? (link)

    • There are four types of panel gimmicks and five types of unit gimmicks. (old info)
    • Any negative effect or thing that put on the board that is against you. The gimmick can be temporary or permanent. If there is a number next to the gimmick then it temporary and that number is the number of turns until it will be remove by itself unless you have unit to counter and/or cure it before it run out. It is permanent if there are no number next to the gimmick and can only be remove through if you got a unit to remove it or counter it by skill.
------------------------------------------------------------------------------------------------------------------------
  • Which gimmicks you most likely will encounter in the quest?

    • Answer: That depend on the quest itself and also there are some quests that don't have any gimmick at all. However there should be at least one if you on any higher difficulty setting quest.
    • This encounter lists is based on the lists of gimmick on this blog which include from low level to high difficulty level setting quest:
      • Most frequently/commonly encounter gimmicks: Junk/Protect/Damage/Timer/Virus
      • Most infrequent/uncommon encounter gimmicks: Lower Atk or Rec/Lower CP Spawn Rated/Darkness/Skill Bind/Lower Tap Count
      • Most rarely encounter gimmicks: Other...
------------------------------------------------------------------------------------------------------------------------
  • Obstruction/Junk panels - Block panels that drop and take up space which can’t be removed by normal clicking. You either need a unit that has the ability to destroy them, use FEVER to reset the board, or use a unit that has a skill to change it into something else. Please note, not all skills can do this.
    • What is it?
      • block that can't be remove through normal click.
    • How to remove it?
      • Unit with a "ability" to remove through normal click.
      • Unit with "skill" that can convert it into something else.
      • Fever (to reset the board).
      • Unit with a "skill" that have laser (may not remove all junk).
------------------------------------------------------------------------------------------------------------------------
  • Protected Panels - The panels get surrounded by a bubble which absorbs one click, or “hit” from an explosion. Some units can hit through this bubble regardless if they have the ability protect break. Other methods are to use large amounts of explosions to forcefully break the protection bubble, absorb the panels with some skill, or through Fever like for junk panels.
------------------------------------------------------------------------------------------------------------------------
  • Damage Panels - They appear like spiked panels and clicking them will cause them to explode and deal damage to the player's health bar, dealt at the end of that turn. Is it possible to go into negative health as long as you heal in that same turn so your life is positive by the end. Units with Damage Panel Break can click these without taking damage.
    • How to remove it?
      • click it normally but you will take damage to your HP.
      • Unit with the "ability" and you will take no damage to your HP as long as they are in front when clicking it or chain-connect.
      • Fever (to reset the board).
      • Unit with a "skill" that can convert or absorb into something else.
-----------------------------------------------------------------------------------------------------------------------
  • Timed Panel - Panels that have a count down timer to exploding doing damage to the players health. These cannot be clicked by themselves. You must link them with another panel of the same color, FEVER or explode them using cskills. Certain units, like DRTH and Troy, have active Skills that can convert Timed Panels into helpful panels as well. Some skills, such as possessed by Fourier, Trident and Azazel, can convert any panel
    • How to remove it?
      • click it with another same color panels as that timer (as they can not be click normally).
      • Fever (to reset the board).
      • "Bomb" blast explosion.
      • Unit with a "skill" that can convert or absorb it into something else.
      • Unit with the "ability" that can click it normally
-----------------------------------------------------------------------------------------------------------------------
  • Virus - The affected unit with Virus takes damage each turn until the virus wears off, which can be trivial damage or grave one depending on the quest. Some units can cleanse this virus using their skill, while others are immune to virus due to their ability.Cleansing the virus is usually enough but some end game quests need all units to be immune to it like Lu Bu’s ultimate quest.
    • How to remove it?
      • Unit with a "skill" that can cure it.
      • Unit with the "ability" to be immune to it.
-----------------------------------------------------------------------------------------------------------------------
  • Counter - Hitting the enemy while counter is active causes them to hit you back once your attack is done. Some units can disable this on the enemy boss, such as Yatagarasu. If the counter’s damage is not too high it can be ignored, but in cases like Musashi where it deals significant damage, the ideal method is to either wait it out by skipping turn, or healing if you do not have the means to break it.
    • How to counter this:
      • Ignore it (if the counter is not much damage to your HP).
      • Unit with a "skill" to remove it.
      • wait it out by skipping a turn or heal while waiting it out (if the damage is significant to your HP).
-----------------------------------------------------------------------------------------------------------------------
  • Attack / Resilience lowering - Some bosses will lower the attack or resilience of the player’s units. This usually can be waited out, however in some cases the boss might start hitting harder, or have a timer which makes getting rid of these stat reductions crucial. Using a cskill or a skill that increases either of these stats cancels it out.
-----------------------------------------------------------------------------------------------------------------------
  • Tap Reduction - Bosses can reduce the amount of taps you get. Use a unit that can either increase your taps, or remove this debuff.
-----------------------------------------------------------------------------------------------------------------------
  • Darkness - Turns the screen black and you cannot see panel links, however you can swipe across panels to see the color. Some unit’s can cleanse this, or are immune to it while they are leading.
-----------------------------------------------------------------------------------------------------------------------
  • Heart/Panel Lock - These Panels will drop normally, but look darkened, and no effect will happen when you chain them. They can still be used to create C Panels. This includes during FEVER! Most enemies using this gimmick lock 1-3 types of panels at a time, although Heart Lock Panels is especially dangerous, since you will not be able to heal normally during this time.
    • What is it:
      • Can not uses that panels effect when lock including during Fever time but they can still chain create CP.
    • How to counter this:
      • wait it out
      • Unit with the "ability" that are immune to lock of certain panel.
-----------------------------------------------------------------------------------------------------------------------
  • C Panel chain - Some Events force players to use an increased number of Panels in chain to create C Panels, OR, an enemy may use an ability which increases the number by 2 or more for a specific amount of turns. If it is an enemy ability, the debuff icon will appear, and you can counter it by using a unit with a skill that increases taps.
-----------------------------------------------------------------------------------------------------------------------
  • Sleep -  Force your Unit/s to go to sleep and to be unable to attack, basically if your unit in front is asleep you are force to skip a turn. If the unit is not in front but is asleep, they cannot uses their "skill" if available. Sleep are temporary and are never permanent (given the fact that it force you to skip your turn). Currently I rarely seen any unit/s that are immune to sleep but I have seen some unit/s that can cure sleep. Most people just wait it out.
    • How to counter this:
      • Unit with the "ability" that are immune to sleep.
      • Unit with the "skill" that can cure this.
-----------------------------------------------------------------------------------------------------------------------
  • Skill Bind -  Force your unit/s to be unable to uses their "skill". This can be temporary or permanent depending on the quest you on.
    • How to counter this:
      • Unit with the "ability" to be immune to this.
      • Unit with the "skill" that can cure this.
-----------------------------------------------------------------------------------------------------------------------
  • Lock Ability - Lock any and all unit/s "ability" for those who has it to be unable to have it. Basically any unit with "ability" (which is a passive) to be lock/turn off. There no known way that I know of to counter this yet but I sure there are. [The sign/symbol for this is a capital "A" with a circle with a diagonal line (I may get the image for this later but I only encounter it once so it be hard to get)]
-----------------------------------------------------------------------------------------------------------------------
  • Hack - If the unit is in front is hack, they are force to skip their turn. If the unit is not in front but is hack, they cannot uses their "skill" if available. This hack gimmick is similar to sleep gimmick.
    • How to counter this:
      • Unit with the "ability" to be immune to this.
-----------------------------------------------------------------------------------------------------------------------
  •  ??? - there one gimmick I remember facing off but don't have the info/pic to remember what it call but it a gimmick where you cannot covert panel to cp expect scp with your skill. You can still create cp using the normal method. This will be update when I get to that.
-----------------------------------------------------------------------------------------------------------------------

Monday, April 2, 2018

Crash Fever - Guide For Beginner (Links)

These are a few link that I found that are quite useful for new player as there are no tutorial or official guide for beginner in the game. They assume you learn it by playing it. I did learn but it took a while after player for while. The in-game "help" button only answer the basic question but not the only you might need when advancing in the game.

Crash Fever Beginners Guide, Tips & Tricks
reddit.com: noob
Beginner Walkthrough
Crash Fever gameplay guides

------------------------------------------------------------------------------------------------------------------
Most of the questions I personally ask could be answer by the in-game help button but a few are not answers expect figuring it on my own. I didn't uses any site to get help. Here are some of the question I ask myself and later figure out.

  • What the maximum rarity in this game?
    • The rare is the star and it go from 1 star to 6 star; 6 star is the highest rarity.
  •  How come there are people with 2 max bug in their unit?
    • that just 1 Max bug, that only show up as two max bug in the reward when the unit is max bug. People with max bug get 2 reward instead of 1.
  • What unit to sell?
    • This answer is for everyone here: that depend on you
      • In general (if based on the rarity of the unit; number of stars): sell 1-3 stars, keep 4-6 stars
        • there are exception to this regardless if it high number of stars or not
          • Keeper and/or Hold on to it until you get better unit: Unit with "ability" (preferable with immunity to a certain gimmick) but any ability will do. Have "skill"  that can change the board to your advantage to attack, defend, and/or to recover regardless if they have "ability" or not.
          • Sell it and/or going/plan to sell it when you get a better unit: buffer unit with no "ability" (I talking about their skill and not CP in regard to the buff).
  • Where should or more like what "fruit" should I uses on my units (without wasting them)?
    • Comments: When I first started, I just randomly put them wherever and didn't care and believe it the best choices. But after playing a while and observing other player's units upgrade and what I believe is the common upgrade setup.
      • With a few exception, most people will upgraded their units using [Red Apple (fruit) ATK] disregard their "type" unless they are Recovery type.
      • If they are Recovery type unit, people will upgrade using [Blue Apple (fruit) REC] unless otherwise stated.
      • The exception to the above are units with attack increase based on either REC or HP that may or may not be the same as their unit type. This information is usually stated on the CP of the unit. (so if you wondering [I did] of what the point of HP fruit if there less uses for it but there are)  

Thursday, March 15, 2018

Crash Fever - Event Quests Tips (Work In Progress for One Self)

Game: Crash Fever
Platform: iOS and Android
Cost: Free to Download (Certain in-game items may require real world money to purchase)

Require be online to play
----------------------------------------------
Crash Fever Wiki!
Crash Fever Official Site - Japanese Language
----------------------------------------------
This is just tips and not a strategy guide. I don't know what unit/s you may have and so I can't say anymore detail then a general tips as a guideline. The above link may have some more detail pointer but this here (blog) is for myself and all the one I done and/or needed to be noted (I done). Most information is based on my game experiences.

If there a (?) it mean I don't remember. If there a picture/image then it based on the highest difficulty (maybe). Based on the difficulty level, some information may change accordingly. Caution this is work in progress and the information may change if the game updated. If I don't put any information about a certain floor or whatever, it either I don't have the information or it not significantly important (at least to me) that most people couldn't deal with it. 

My Personal opinion whether it hard to solo using somewhat not so rare unit (those without ability and/or at least one ability).
  • Fair: Depend on the whether it "Easy-Legend" or Wizard or above 
  • Average: can beat it if you set up your party right without failing
  • Hard: Will or might fail without using polygons to continue playing [or] using help [or] go multiplayer mode [or] not using the right set up party to fight.
------------------------------------------------------------------------------------------------------------------------
Easy ~ Legend Quests
------------------------------------------------------------------------------------------------------------------------
Comment: Some of these quests have requirement while other don't. I'm only just going lists the one with the requirement the rest you can click the link at this side. (link)
------------------------------------------------------------------------------------------------------------------------
Quests with Requirement Lists:
  • A Hunter's Elegy [Multiplayer only Quest]
  • Backstreet Brawl [Stamina Units Only Quest]
  • Bow To Your Superiors [Dragon Units Only Quest]
  • Heartless Executioner [Animals with a cost of 30 or less!]
  • Lemon-Colored Shock [Units with a cost of 30 or less!]
  • Quarantine Escape! [Human Units Only Quest]
  • Red Hares on horseback! [Units with a cost of 30 or less!]
  • Run the Sniper's Gauntlet [Multiplayer only Quest]
  • Selection by Lightning Round [Multiplayer only Quest]
  • The Little Dragon [Units with a cost of 30 or less!]
  • The Seeker of Truth [Mech Units Only Quest]
------------------------------------------------------------------------------------------------------------------------
 Wizard Quests
------------------------------------------------------------------------------------------------------------------------

------------------------------------------------------------------------------------------------------------------------
  • Amaterasu Invades! (Wiki link with detail)
    • Personal Opinion: Hard 
      • 1F: Yellow attribute 
        • side unit high attack
        • middle unit normal attack plus seal bind
      • 2F: Red attribute 
      • [3F]: Red attribute (virus/darkness/high attack to red unit)
      • [3F]: Red attribute 
        • middle red unit can: virus/high attack to red, green, and/or yellow unit/self-heal/darkness
        • side red unit can: absorb red to attack
      • 4F: Red attribute
      • 5F: Red attribute (1 Round [Legend]/3 Round [Wizard])
        • R1: high attack to deity unit
        • [R2]: protect/skill bind
        • [R3]: buff at the start of the round but not attack, after several turn she will instantly kill you. virus and seal bind after she buff herself. (when she buff, she is extremely hard to hit/kill so be warn)
------------------------------------------------------------------------------------------------------------------------
  • Antoine Invades! (Wiki link with detail)
    • Comment: My advise is to have a balance team of junk breaker and protected panel breaker. My mistake on the first try is to only have junker breaker which cause me to prolong the fight because of the protected panel.
    • Personal Opinion: Average 
      • 1F: Green then Blue attribute 
        • Green unit is freebie, will give you buff then runaway
        • Blue unit (protect)
      • 2F: Red and Green attribute 
        • Red Unit can: high attack to green unit/protect red panel and heart panel/junk/skill bind
        • Green unit can: protect/lower attack/absorb junk for buff/junk
      • 3F: Green/Blue/Green attribute (junk at the start of the round/protect)
        • Blue unit can: absorb junk for buff
        • Left side Green unit can: skill bind/junk
      • 4F: Blue attribute (3 Round)
        • R1: protect
        • R2: junk/absorb junk for buff
        • R3: 1 taps and lower attack at the start of the round/protect/high attack combo if battle drag on
------------------------------------------------------------------------------------------------------------------------
  • Atlas Invades!
    • Personal Opinion: Average 
      • 1F: Red/Green/Red attribute (lower rec and attack at the star of the round/junk)
      • [2F]: Red and Yellow attribute 
        • (Red unit will give high damage to animal unit at the start of the round)
      • [2F]: Blue and Yellow attribute
      • 3F: Green attribute (junk)
      • 4F: Green attribute (2 Round)
        • R1: junk
        • R2: skill bind/protect/junk/darkness/absorb junk?
------------------------------------------------------------------------------------------------------------------------
  • Benkei Musashibo Invades!
    • Personal Opinion: Hard 
      • 1F: Red attribute
      • 2F: Red/Yellow/Blue attribute (covert panel to another to attack)
        • Blue Units: Protect/Heal plus Attack
        • Yellow Unit: lock heart/
      • 3F: Green attribute (skill bind/remove 1 taps)
      • 4F: Yellow attribute Boss battle (2 Round [Legend]/3 Round [Wizard]) 
        • R1:lower cp drop/protect/high attack
        • R2: lock heart/high attack to non-green unit/protect
        • [R3]: protect/high attack plus remove counter
------------------------------------------------------------------------------------------------------------------------
  • Brahma Invades!
    • Comment: Don't bring/uses Human unit in this quest, please refer to 1F.
    • Personal Opinion: Hard 
      • 1F: Blue attribute (High damage to Human unit)
      • 2F: Blue attribute (protect/right side blue unit can seal bind)
      • 3F: Blue attribute (2 Round)
        • R1: Freebie; you can attack but it not an actual battle
        • R2: protect
      • 4F: Blue attribute (darkness at the start of the round/protect)
      • 5F: Blue attribute (2 Round)
        • R1: protect/virus/absorb green to attack
        • R2: protect/attack based on it HP/high attack
------------------------------------------------------------------------------------------------------------------------
  • Cao Guojiu Invades! [No Yellow Panels!]
    • Personal Opinion: Hard  
    • Advise: Either ignore the virus attack on 2F and set up a team with firepower or have one teammate have the CP to cure virus. What you need to watch out for is the "full heal" of R3 on 4F during the boss fight. If your attack or combination of skills or even "fever" is lower then her "full heal " then "give up/retire" until you get better units or team set up because this battle will go nowhere.
      • 1F: Green attribute (protect)
      • 2F: Green attribute (2 Round) 
        • There will be protect and timer in R1 and if drag on there will be junk. 
        • Virus [permanent until cure] in R2, there will be damage panel if drag on
      • 3F: Green attribute (protect)
      • 4F: Green attribute (3 Round) 
        • In R1 she will lower bomb blast attack, create damage panel and timer, she also absorb timer to attack. 
        • In R2 there will be protect but if drag on there will be damage panel. Can Create yellow panel. Can convert yellow panel to green damage panel.
        • In R3 at the start of the round there will be darkness+junk. She can self-heal back to max hp if her hp is lower even if her heath is still 90 percent and if the battle drag on she will attack you with a huge attack in R3 that can instantly kill you.
------------------------------------------------------------------------------------------------------------------------
  • Cascade Invades! (Wiki link with detail)
    • Advise: The hard choice is between anti-virus or junk breaker. Don't uses/bring blue unit, please refer to 2F.
    • Personal Opinion: Hard 
      • 1F: Yellow attribute (This is close to a freebie but a bad one as they give: virus [Permanent] +skill bind + sleep, then runaway)
      • 2F: Yellow attribute (2 Round)
        • R1: High damage to blue units/absorb junk to attack
        • R2: junk/absorb junk to attack 
      • 3F: Blue/Green/Blue attribute (virus at the start of the round. Blue unit can cause high damage to those infect by virus)
      • 4F: Green attribute Boss battle (3 Round)
        • R1: high damage to those infect by virus
        • R2: junk/absorb junk to attack/virus
        • R3: junk/absorb junk to attack   
------------------------------------------------------------------------------------------------------------------------
  • Colchis Invades!
    • Comments: Just uses yellow unit and Don't bring any animal units, please refer to below information.
    • Personal Opinion: Average 
      • 1F: Blue attribute (High attack to red unit at the start of the round)
      • 2F: Blue attribute (2 Round)
        • R2: Protect plus high attack to animal units/absorb red panels to attack
      • 3F: Yellow attribute (2 Round; counter)
        • R1: Protect
        • R2: Virus/Protect plus high attack to non-yellow units
      • 4F: Blue attribute (2 Round)
        • R1: Protect/absorb blue to attack
        • R2: Protect/heart to junk
------------------------------------------------------------------------------------------------------------------------
  • Diaochan Invades!
    • Advise: Don't uses or bring Yellow or Blue unit, please refer to "[Wizard]" on [R3].
    • Personal Opinion: Average 
      • 1F: Yellow attribute
      • 2F: Yellow attribute (2 Round; Protect)
      • 3F: Red/Yellow attribute (virus at the start of the round. Yellow unit enemy can skill bind)
      • 4F: Green attribute Boss battle (2 Round [Legend]/3 Round [Wizard]) 
        • R1: junk. 
        • R2: absorb junk. 
        • [R3]: junk/high attack on yellow and blue unit/skill bind/absorb junk.   
------------------------------------------------------------------------------------------------------------------------
  • Dong Zhuo Invades!
    • Recommend to bring a unit that can cure virus or immune to virus attack; almost every Floor they have someone that can attack you with a virus attack. Maybe bring healer (HP recover) for the boss battle.
    • Personal Opinion: Hard 
      • 1F: Green attribute (Middle Unit: Virus)
      • 2F: Red attribute  (2 Round) 
        • R1: high normal attack
        • R2: virus at the start of the round/timer
      • 3F: Green attribute (right unit: virus)
      • 4F: Green attribute  (3 Round)
        • R1: counter/high attack to animal units/virus/high attack
        • R2: lower attack at the start of the round/high attack to blue units/absorb heart to heal
        • R3: timer/high attack that might or will instant kill after a 1 or 2 turns in the early round. 
------------------------------------------------------------------------------------------------------------------------
  • Freyr Invades!
    • Personal Opinion: Average
      • 1F: Red/Green/Red attribute 
        • left red unit can seal bind
        • green unit can cause high damage to yellow unit. the green unit can also heal all while attacking
      • 2F: Blue attribute enemy (lower rec/lock heart)
        • 3F: Red attribute (2 Round; junk/virus)
        • 4F: Red attribute Boss battle (3 Round)
          • R1: Absorb red to buff
          • R2: lock heart
          • R3: timer/lock red
    ------------------------------------------------------------------------------------------------------------------------
    • Gareth Invades! (Wiki link with detail)
      • Comments: This is incomplete due to the fact I uses non-general units to do this quests and I finish fairy quickly
      • Personal Opinion: Hard 
        • 1F: Green/Yellow attribute (2 Round; green unit will just show and go away at the start.) 
        • 2F: Red/Green/Blue attribute (Stated that they will self-destruct when it's their turns)
        • 3F: Red attribute (2 Round)
          • R1: shrink all cp on the board at the start, if the cp is small already then it will remove from the board/high attack
          • R2: high attack/timer/absorb panels to attack
        • 4F: Green attribute (3 Round)
          • R1: (N/A)
          • R2: remove counter/reduce non-red damage for several turns
          • R3: (N/A)
    ------------------------------------------------------------------------------------------------------------------------
    • Grimm Invades! (Wiki link with detail)
      • Personal Opinion: Average 
        • 1F: Red/Green attribute
          • Red unit: buff def/combo hit/"strong" counter for 1 turn/high attack to animal unit
          • Green unit: buff attack/combo hit/counter 3 turn
        • 2F: Blue/Yellow attribute 
          • Blue unit: junk
          • Yellow: high attack to human unit
        • 3F: Green/Yellow/Redd/Blue attribute
          • 4F: Green attribute (2 Round)
            • R1: timer
            • R2: timer
          • 5F: Green attribute (3 Round)
            • R1: absorb heart to attack/high attack to dragon unit
            • R2: high attack to deity unit/cp conversion seal (permanent)/protect
            • R3: high attack to weapon unit/absorb heart to attack
      ------------------------------------------------------------------------------------------------------------------------
      • Hanbei Takenaka Invades!
        • Personal Opinion: Average 
        • Comment: You should set up a team that break damage panel as a priority then the break Protect panel.
          • 1F: Blue attribute
          • 2F: Blue attribute (Damage and Protect. Will revive it buddy  with 30% HP if you only destroy one of them and will continue to do so if you don't destroy them both at the same time.)
          • 3F: Blue attribute (3 Round) 
            • R1: Damage. 
            • R2: Damage/ Protect/absorb damage panel to attack if battle drag on/minor self-heal if battle drag on. 
            • R3: Damage/Protect/absorb damage panel to attack if battle drag on.)
      ------------------------------------------------------------------------------------------------------------------------
      • Hel Invades!
        • Personal Opinion: Average 
          • 1F: Yellow attribute (2 round, each)
            • R1: (left side) absorb heart to attack
            • R2: (left side) damage panel
            • R1: (right side) high attack to red units/high attack to yellow units
            • R2: (right side) timer
          • 2F: Blue attribute (freebie; absorb timer and damage panel for you and then run away. basically clean the board for you.)
          • 3F: Yellow attribute (2 round)
            • R1: damage panel
            • R2: timer
          • 4F: Yellow attribute (3 round) 
            • R1: timer/damage
            • R2: timer at the start of the round/timer
            • R3: lower bomb blast/damage/absorb damage to attack
      ------------------------------------------------------------------------------------------------------------------------
      • Hongryeon Invades!
        • Comment: Don't uses/bring Mech unit and Recovery type unit in this quest.
        • Personal Opinion: Hard 
          • 1F: Yellow attribute (skill bind mech unit for 99 turn at the start of the round)
            • Side Yellow unit: buff attack
            • Middle Yellow unit: damage/buff if side unit die
          • 2F: Green attribute (2 Round)
            • R1: virus at the start of the round/lower atk/lower cp drop rate
            • R2: damage/lower atk
          • 3F: Yellow attribute (2 Round)
            • R1: lower bomb blast at the start of the round/skill bind mech unit for 99 turns/lower atk/virus on recovery type unit
            • R2:lower bomb blast/virus on recovery type unit/damage/heart to blue/absorb blue to attack/deal more damage each turn (if battle prolong)
          • 4F: Yellow attribute (3 Round)
            • R1: virus (permanent) + skill bind mech  for 99 turns at the start of the round/fixed high attack/lower atk/one high attack when HP low
            • R2: virus (permanent) + lower bomb blast at the start of the round/lower cp spawn/absorb blue to attack/damage/lower atk/low REC/absorb damage panel to attack/deal more damage each turn (if battle prolong)
            • R3: virus (permanent) + lower bomb blast + lower REC at the start of the round/damage/high attack to virus infected recovery type unit/lower atk/low REC/deal more damage each turn (if battle prolong)
      ------------------------------------------------------------------------------------------------------------------------
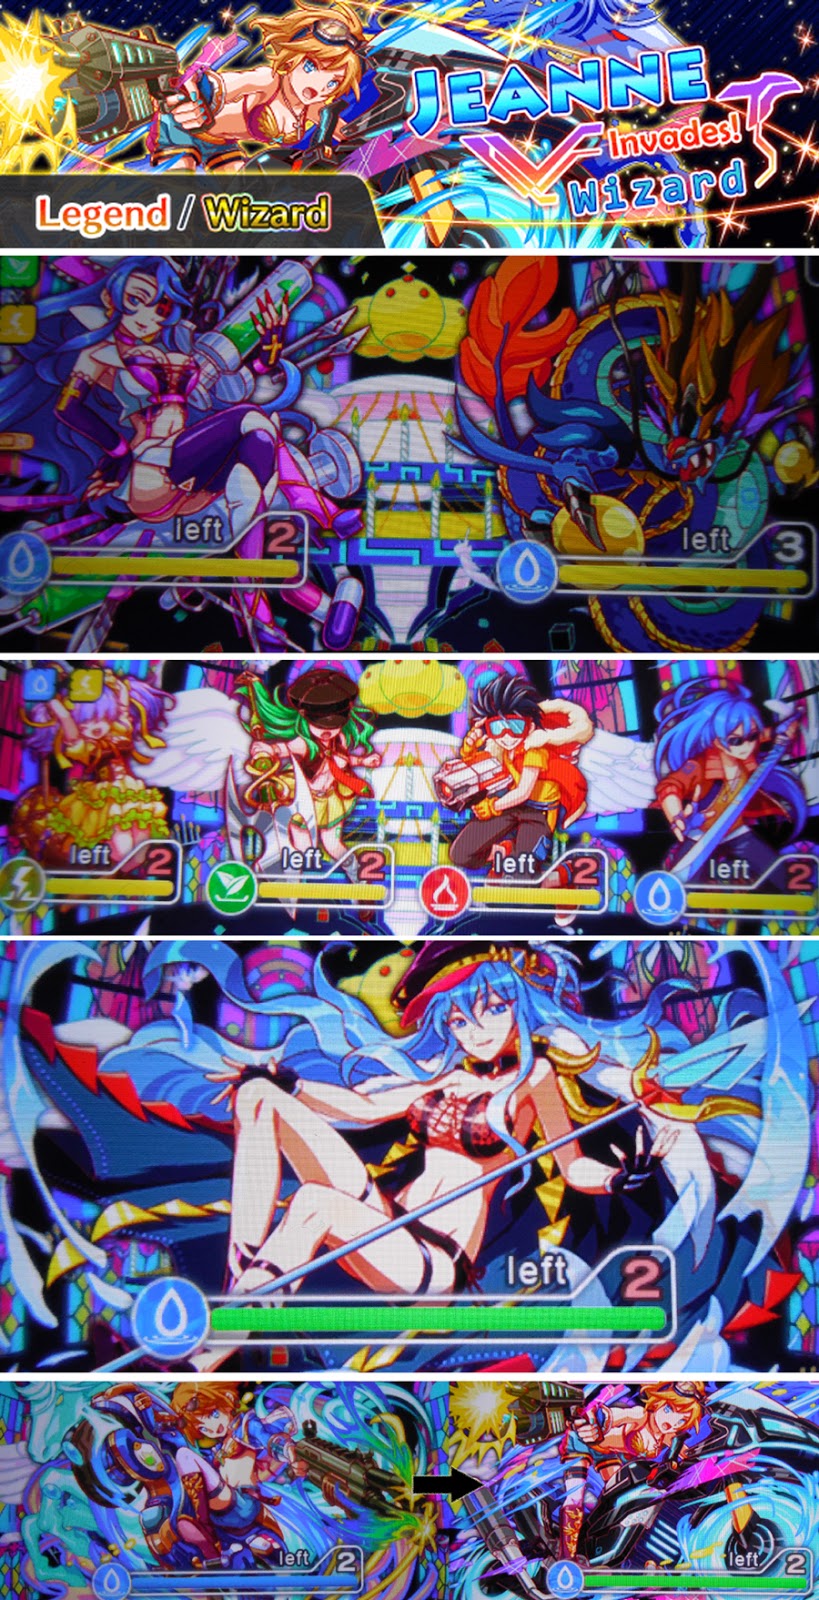
      • Jeanne Invades! (Wiki link with detail)
        • Personal Opinion: Average 
          • 1F: Blue attribute; recommend by focusing on attacking one side first.
          • 2F: All attribute; beware of Timers at the start of the round.
          • 3F: Blue attribute (2 round; high damage when the enemy hp is lower)
          • 4F: Blue attribute (3 round) 
            • beware of lock heart in R1
            • 1 taps and skill binds for several turns in R2
            • high attack in R3
      ------------------------------------------------------------------------------------------------------------------------
      •  Jekyll & Hyde Invades!
        • Recommend to bring a unit that can cure virus or immune to virus. Most floor will have an enemy unit that can cause virus attack as well as high damage to those infected by virus. Beware of skill binds and protected panel in this quest.
        • Personal Opinion: Hard 
          • 1F: Yellow attribute
            • Side Yellow: virus (for several turns)/high attack to infected virus units/protect
            • Middle Yellow: protect/attack all 
          • 2F: Red attribute (2 Round)
            • R1: counter at start
            • R2: counter at start + protect + one tap for several turn at the start of the round/protect
          • 3F: Red attribute
            • side unit: protect
            • middle unit:  protect/skill bind/disable ability/virus
          • 4F: Red attribute (3 Round; above warning)
            • R1: give protected drop at the start of the round
            • R2: self heal + high attack to infected virus units/attack + virus (permanent)/lower attack/lower rec
            • R3: protect at the start of the round
      ------------------------------------------------------------------------------------------------------------------------
      • Kali Invades! (Wiki link with detail
        • Advise: Don't uses/bring "unidentified" units in this quest. Bring a unit that can break junk.
        • Personal Opinion: Average 
          • 1F: Blue and Yellow attribute (2 Round) 
            • Yellow unit will get 2 round while the Blue unit will not attack and will run away
            • R2: absorb panels to buff/high damage to unidentified units
          • 2F: Red attribute (small chance of junk drop from heart panels [permanent]/junk) 
          • 3F: Blue attribute (3 Round)
            • R1: absorb junk to attack
            • R2: absorb panels to heal
            • R3: absorb junk to heal
          • 4F: Green attribute (2 Round) 
            • R1: high damage to unidentified units at the start of the round/absorb heart to heal/damage
            • R2: damage panel at the start of the round/if prolong the fight, there will be many more damage/absorb heart to heal
      ------------------------------------------------------------------------------------------------------------------------
      • Koryu Invades! (Wiki link with detail
        • Comment: This quest has alot of high attacker, so be prepare to bring your own heavy hitter.
        • Personal Opinion: Hard 
          • 1F: Blue attribute 
          • 2F: Blue attribute 
            • Side unit: skill bind plus heal
          • 3F: Blue attribute
            • Left unit: high attack
            • Right unit: self heal/attack
          • 4F: Blue attribute (2 Round) 
            • R1: buff at the start/high attack combo
            • R2: buff at the start/high attack combo/lower your attack
      ------------------------------------------------------------------------------------------------------------------------
      • Lan Caihe Invades!
        • Comment: Don't bring/use Human units. Recommend to have at least one unit that can heal HP without using heart panel if you don't have a counter for the lock heart which is permanent. If you have units that can counter cp spawn rate and/or immune to sleep attack then that better. If not like me, then focus on the heal. Just play this as if there no heart panel. (I don't remember if the boss can uses sleep attack or not, but it most likely)
        • Personal Opinion: Hard 
          • 1F: Blue/Red/Blue attribute (lower rec at the start of the round)
            • Blue unit: attack plus self heal
          • 2F: Blue attribute (2 Round; lower CP spawn rate at the start [permanent])
            • R1: attack plus Sleep 2 units
            • R2: attack plus Sleep 2 units
          • 3F: Blue attribute
            • Side unit: Attack plus Sleep
            • Middle unit: Lock Heart [permanent]
          • 4F: Blue attribute (3 Round) 
            • R1: lower CP spawn rate at the start/high attack to human units/attack base on it own HP
            • R2: Lock Heart at the start of the round/high attack to human units
            • R3: lower CP spawn rate at the start/high attack to human units
      ------------------------------------------------------------------------------------------------------------------------
      • Lupica Invades!
        • Personal Opinion: Hard 
          • 1F: Green/Green/Blue attribute
            • middle green unit can create protect
            • blue unit can covert panels to other panels while giving high attack
          • 2F: Yellow attribute (2 Round; can covert heart to yellow)
            • R2: lock heart for several turns/absorb panels to attack
          • 3F: Yellow attribute (protect/will runaway once it's HP is down around 10%, will give you heart panels when it do so unless you kill it before that happen)
            • 4F: Yellow attribute (3 Round) 
              • R1: Switch to Blue attribute for several turns at the start of the round/Protect/absorb panels to attack
              • R2: Switch to Red attribute for several turns at the start of the round/timer/absorb panels to attack
              • R3: High attack/Protect/timer
        ------------------------------------------------------------------------------------------------------------------------
        • Muryu Invades!
          • Personal Opinion: Average 
            • 1F: Yellow and Red attribute
            • 2F: Red attribute (2 Round; timer and darkness in R2)
            • 3F: Green attribute (2 Round; timer and later protect in R1. In R2 it going to absorb red panel to attack)
            • 4F: Green attribute (3 Round) 
              • darkness + timer in R1 and later absorb red panel to attack. 
              • In R2 he will remove 1 taps at the start of the round, later there will be darkness, protect, and timer. 
              • In R3 there will be timer, lot of them.
        ------------------------------------------------------------------------------------------------------------------------
        • Musashi Miyamoto Invades! (Wiki link with detail)
          • Comments: All counter in this quest are deadly, either kill them in one go or ride it out by not attacking them until the counter expire.
          • Personal Opinion: Hard 
            • 1F: Red attribute (buff at the start)
            • 2F: Yellow and Blue attribute (junk at the start)
              • Blue Unit: junk
            • 3F: Green attribute (Counter/the lower the Hp the higher the attack)
            • 4F: Yellow attribute (2 Round)
            • 5F: Yellow attribute (3 Round)
              • R2: Counter at the start for 5 turns
              • R3: buff
        ------------------------------------------------------------------------------------------------------------------------
        • Naga Invades! (Wiki link with detail)
          • Caution: There will junk and virus depending on the floor you on in this quest.
          • Personal Opinion: Average 
            • 1F: Yellow and Red attribute
            • 2F: Green attribute (2 Round; virus)
            • 3F: Green and Red attribute (junk)
            • 4F: Green attribute (3 Round) 
              • virus in R1 
              • junk in R2 and will absorb the junk to heal HP
              • junk in R3
        ------------------------------------------------------------------------------------------------------------------------
        • Osamu Dazai Invades! [ No Heart Panels!]
          • Advise: Either bring a unit that can heal or convert panel to hearts. Beware of damage panel in this quest.
          • Personal Opinion: Average  
            • 1F: Yellow/Green/Yellow attribute  (green unit can skill bind if battle drag on)
              • 2F: Green and Red attribute (damage panel at the start of the round)
              • 3F: Green/Red/Green attribute (red unit can skill bind)
                • 4F: Green attribute  (2 Round [Legend]/3 Round [Wizard])
                  • R1: damage panel
                  • R2: damage panel
                  • [R3]: lower rec/damage panel/high damage combo
            ------------------------------------------------------------------------------------------------------------------------
            • Osiris Invades!
              • Caution: There will be NO Yellow Panel in this quest even if not stated. Do not uses/bring Human Unit in your team, please refer to boss fight. Do not uses/bring Mech unit in your team, please refer to [Wizard] in [3F].
              • Personal Opinion: Hard 
                • 1F: Green attribute 
                  • At the start of the round, lower bomb blast (for the whole quest). 
                  • left side unit will cause virus. Will buff attack and defense to the right side unit
                  • right side unit will attack. 
                • 2F: Yellow attribute
                • [3F]: Green attribute (2 Round, each)
                  • Right side unit can cause high damage to mech unit
                  • Timer (red) and later other color
                • [3F]/[4F]: Green attribute  (2 Round [Legend]/3 Round [Wizard])
                  • R1: Seal the uses of skills to convert to CP (permanent)/lower bomb blast/high damage to human unit/timer (yellow) but later other color/darkness
                  • R2: high damage to human unit/timer
                  • [R3]: At the start this round, reduce 1 taps for several turns/lower rec for several turns/a fix damage of 44,444 after buffing of attack and defense.
            ------------------------------------------------------------------------------------------------------------------------
            • Ox-Head and Horse-Face Invades! [No Heart Panels!]
              • Comment: Don't Bring/Uses human units in this quest. Beware of virus. 
              • Personal Opinion: Average  
                • 1F: Red attribute (skill bind human units at the start of the round)
                  • Left unit: attack all
                  • Right unit: high attack to human units
                • 2F: Yellow and Green attribute (Virus at the start of the round)
                  • Yellow unit: high attack to blue unit/high attack to animal units
                  • Green unit: virus
                • 3F: Green attribute (2 Round)
                  • R1: timer/absorb green to attack
                  • R2: self heal
                • 4F: Green attribute (2 Round)
                  • R1: virus at the start of the round/high attack to animal unit plus junk
                  • R2: virus at the start of the round
            ------------------------------------------------------------------------------------------------------------------------
            • Shakespeare Invades! (Wiki link with detail)
              • Personal Opinion: Hard 
                • 1F: Blue/Yellow/Blue attribute
                  • Left side Blue unit can give high attack to "Red" units
                  • Yellow unit can give high attack to "Deity" units
                  • Right side blue unit can create "Junk"
                • 2F: Yellow and Red attribute (Damage panel at the start of the round)
                  • Yellow unit can create junk and damage panel
                  • Red unit can create damage panel and cause high attack to "green" unit
                • 3F: Yellow attribute (3 Round)
                  • R1: junk/damage
                  • R2: junk/damage/absorb red to attack
                  • R3: damage/high attack to green units and then yellow units/absorb junk to buff/junk
            ------------------------------------------------------------------------------------------------------------------------
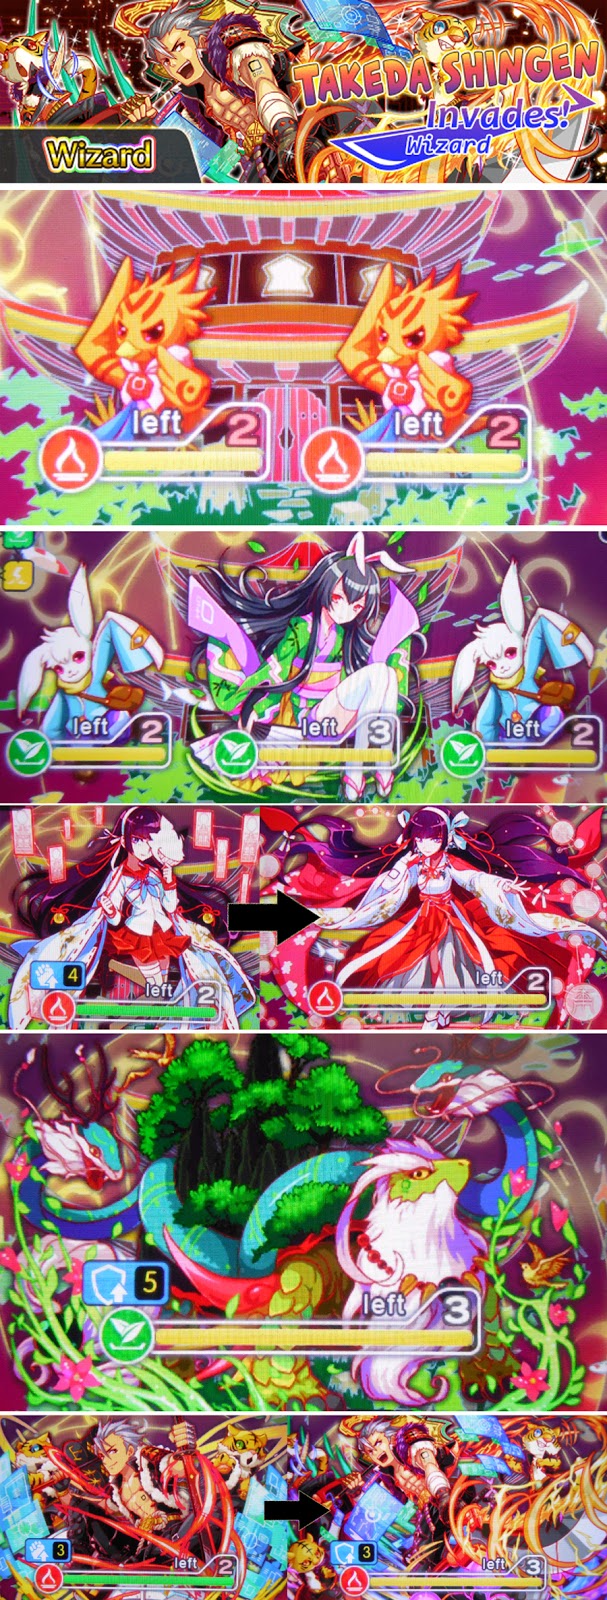
            • Shingen Takeda Invades!
              • Personal Opinion: Average 
                • 1F: Red attribute
                • 2F: Green attribute
                • 3F: Red attribute (2 Round)
                • 4F: Green attribute (the lower this green unit HP is, the higher it attack power)
                • 5F: Red attribute (3 Round)
                  • R1: switch itself into a green attribute unit
                  • R2: switch itself back into a red attribute unit
                  • R3: can cause one huge attack
            ------------------------------------------------------------------------------------------------------------------------
            • Shoki Invades! (Wiki link with detail)
              • Personal Opinion: Average 
                • 1F: Green attribute (freebie; no fight. Your party is given sleep immunity buff for 30 turns)
                • 2F: Blue and Yellow attribute (yellow unit can cause virus)
                • 3F: Blue and Yellow attribute (blue unit can create junk)
                • 4F: Yellow and Green attribute
                • 5F: Green attribute (3 Round)
                  • R1: Sleep at the start of the round
                  • R2: Timer/Protect
                  • R3: No skill CP conversion at the start of the round/protect
            ------------------------------------------------------------------------------------------------------------------------
            • Typhon Invades! (Wiki link with detail)
              • Personal Opinion: Hard 
                • 1F: Green/Yellow/Blue attribute [In order of attack from left to right: High damage to Red Units/Human Units/Yellow Unit]
                • 2F: Green/Yellow/Green attribute [In order of attack from left to right: High damage to Red Units/Human Units/Red Unit]
                • 3F: Yellow attribute (2 Round) 
                  • 1 taps for 5 turn at the start of the round, skill bind in R1. 
                  • In R2, absorb certain color panel for high damaging attack (different color for each attack; absorb non-green to buff itself after awhile.) 
            ------------------------------------------------------------------------------------------------------------------------
            • Wakahirume Invades!
              • Caution: There will damage panel in this quest.
              • Personal Opinion: Average 
                • 1F: Green attribute
                • 2F: Green attribute (2 Round; damage panel)
                • 3F: Red attribute (will bind skill at the start of the round for 1 turn)
                • 4F: Green attribute (3 Round) 
                  • normal attack as a boss in R1
                  • darkness in R2 for several turn
                  • will absorb 10 panel of one color (she will change color each time she attack) to increase her attack in R3)
            ------------------------------------------------------------------------------------------------------------------------
            • Uranus Invades! [Deity units only]
              • Personal Opinion: Hard  
              • Comment: This quest will try to lower all your unit attack power. It advisable to not bring yellow unit if you can (please refer to 3F).
                • 1F: Red/Green/Red attribute (High damage to non-deity unit at the start of the round. The red enemies unit will boost it attack power & attack you each turn while the green enemy will heal all in each turn. According to in-game advise/tip it stated to gather CP so you can take these enemies out easier in one go. If you can't [like me] then just focus on one enemy while taking in the advise of the in-game tips.) 
                • 2F: Blue/Yellow/Red attribute (Type of attack from left to right: heal/attack/attack. In this floor, your attack power will be lower)
                • 3F: Green attribute (Type of attack from left to right: high damage to yellow unit/high damage to all. Right side unit will lower your tap to 1 if drag on the battle)
                • 4F: Green attribute (3 Round) 
                  • At the start of the round all status reset to normal. R1: attack all/attack all based on it's own HP/lower CP drop. 
                  • R2: timer/absorb red panel to attack/attack all based on it's own HP. 
                  • R3: lower blue panel drop to none/absorb red panel to attack. 
            ------------------------------------------------------------------------------------------------------------------------
            • Xena Invades! (Wiki link with detail)
              • Personal Opinion: Hard 
                • 1F: Red attribute (The one that look different will attack all with a huge attack while the rests will either combo attack or mini attack)
                • 2F: Red/Blue/Yellow attribute 
                  • Red Unit: High attack to green units
                  • Blue Unit: High attack to red units
                  • Yellow Unit: High attack to blue units
                  • 3F: Blue attribute (2 Round; junk/high attack)
                  • 4F: Green attribute (2 Round - side unit only)
                  • 5F: Blue attribute (3 Round)
                    • R1: virus (<--sometime, the virus attack does not always appear)
                    • R2: timer
                    • R3: high attack
              ------------------------------------------------------------------------------------------------------------------------
              • Xenobia Invades!
                • Caution: There will damage, junk, and protect in this quest.
                • Personal Opinion: Average 
                  • 1F: Yellow and Green attribute (Protect)
                  • 2F: Blue attribute (Protect and Damage)
                  • 3F: Blue attribute (2 Round; Damage and Protect)
                  • 4F: Green attribute (2 Round) 
                    • damage in R1 as well as absorb your CP to attack. 
                    • Junk & sleep in R2 and will absorb the junk to increase her attack
              ------------------------------------------------------------------------------------------------------------------------
              • Yomi Invades! (Wiki link with detail)
                • Comment: During 2F during R2, either kill it in one go or do not attack as this counter is deadly.
                • Personal Opinion: Average 
                  • 1F: Blue and Yellow attribute
                  • 2F: Green attribute (2 Round, middle unit only)
                    • R1: Middle unit: High attack to deity units
                    • R2: Middle unit: Counter for 1 turn at the start
                  • 3F: Red attribute (virus [Permanent] at the start of the round)
                  • 4F: Yellow attribute (3 Round)
                    • R1: virus at the start of the round
                    • R2: virus at the start of the round/high attack to deity unit/sleep 2 unit for 2 turns
                    • R3: buff at the start/absorb green to attack
              ------------------------------------------------------------------------------------------------------------------------
              • Yue Lao Invades!
                • Personal Opinion: Average 
                  • 1F: Red and Green attribute 
                    • [In-game tip/advise]: After either several turns pass or you defeat one of the pair, the other will flee, so keep healing and withstand the assault!
                  • 2F: Green and Red attribute (the green unit can lock red panel/the red unit can cause darkness) 
                  • 3F: Yellow attribute (right side unit can absorb heart to attack)
                  • 4F: Yellow attribute
                  • 5F: Yellow attribute (3 Round)
                    • R1: Junk
                    • R2: Junk/Skill Bind
                    • R3: Junk
              ------------------------------------------------------------------------------------------------------------------------
               Ultimate Quests
              ------------------------------------------------------------------------------------------------------------------------

              ------------------------------------------------------------------------------------------------------------------------
              Special
              ------------------------------------------------------------------------------------------------------------------------
              Quest that occasionally appear on the Special Quest board, like a Special event or Holiday. Quest difficulty level range from Easy to Ultimate, depend on the quest itself. These quests may or may not appear/apply to your region (expect maybe the country of origin who created this game, I assume). Some of these quests also come with "Hatcher" in the "Hatcher" that you need to purchase separately with polygons that may or may not help you on those quests.
              ------------------------------------------------------------------------------------------------------------------------
              • Forever Friends [ALICE PANIC! Special Quest]
                • Floors: 2 or 3
                  • Numbers of floors vary each time you play and it didn't matter which difficulty setting you on.
                • Gimmicks: Protected Panels
                • Comments: You can bring "Animal" Tribe unit for a minor advantage but it not much of an advantage for advance player with better units. Early floor are random who you face off with, with the exception of the bosses fight where you have to fight 3 time against the boss regardless of which difficulty setting you on. The side image are the possible foes you might face and the boss.
                • Bosses Fight: Blue Attribute (3 Round)
                  • R1: Animal units get [-1] skill to there skills at the start of the round (player advantage)/high fixed attack/absorb red to attack/protect/buff 
                  • R2: lower attack/protect/easy cp spawn (player advantage)/absorb 10 panels to attack
                  • R3: absorb heart panels to heal/attack all unit (high attack)/lower 1 taps for 1 turns/absorb 12 panels to attack
              ------------------------------------------------------------------------------------------------------------------------
              • Hikoboshi Invades!
                • Personal Opinion: Average 
                  • 1F: Green attribute
                    • Side Units: buff attack
                    • Middle Unit: attack all/will lower rec to zero for several turns if her HP is low
                  • 2F: Green attribute
                    • Skill bind  (for several turns) plus protect green panels at the start of the round/high attack on one unit/red panel to green panel plus high attack on one unit/lock heart (when hp low)
                  • 3F: Green attribute 
                    • Left Green: normal attack plus minor self heal
                    • Right Green: absorb heart to attack
                  • 4F: Green attribute (2 Round)
                    • R1: protect heart at the start of the round/red panel to green panel
                    • R2: protect heat plus buff def. at the start of the round/timer (green)
              ------------------------------------------------------------------------------------------------------------------------
              • Sweet-Fanged Vampire [Halloween 2017 Quest] - [WIZARD/ULTIMATE]
                • Comments: I did not finish this quest due to two factor: don't have the right units and not enough time to finish it by the time I got the right units. But this a perimeter report of What I know before I fail. 
                • Floor: 2
                • Gimmicks: Protected Panels and Damage Panels
                • Personal Opinion: Hard  
                • The following information is a "work in progress"
                  • 1F: Green attribute (2 Round)
                    • R1: hit her once and it straight to R2
                    • R2: give [-2] skill at the start (player advantage)/damage plus protect
                  • 2F: Yellow attribute (3 Round)
                    • R1: lower all stat for 2 turn (when hit)/damage/protect
                    • R2: take away 80% of your HP at the start of the round/damage/attack get stronger each turn
                    • R3: convert one side of the board to a single color panel/protect/instant kill when it's HP at 80%
              ------------------------------------------------------------------------------------------------------------------------